Winter Swale Mapping for Beginners: Water Harvesting
Imagine standing on your sloped homestead this winter, watching sheets of rain rush downhill. Your topsoil slips away, paths turn to mudslides, and potential garden spots stay parched come summer. Frustrating, right?
As a beginner in permaculture, you're planning your design, dreaming of abundant gardens without endless watering bills. Permaculture swales change everything. These simple, on-contour ditches slow, spread, and sink water right where you need it.
Winter is prime time for this mapping. Bare ground reveals true water paths—no summer weeds hiding the flow. You'll observe patterns now, design swales later, and build a water-secure paradise.
This guide walks you through it, step by step. No heavy tools needed. Just your eyes, a few basics, and permaculture smarts. Ready to turn winter woes into watery wins?
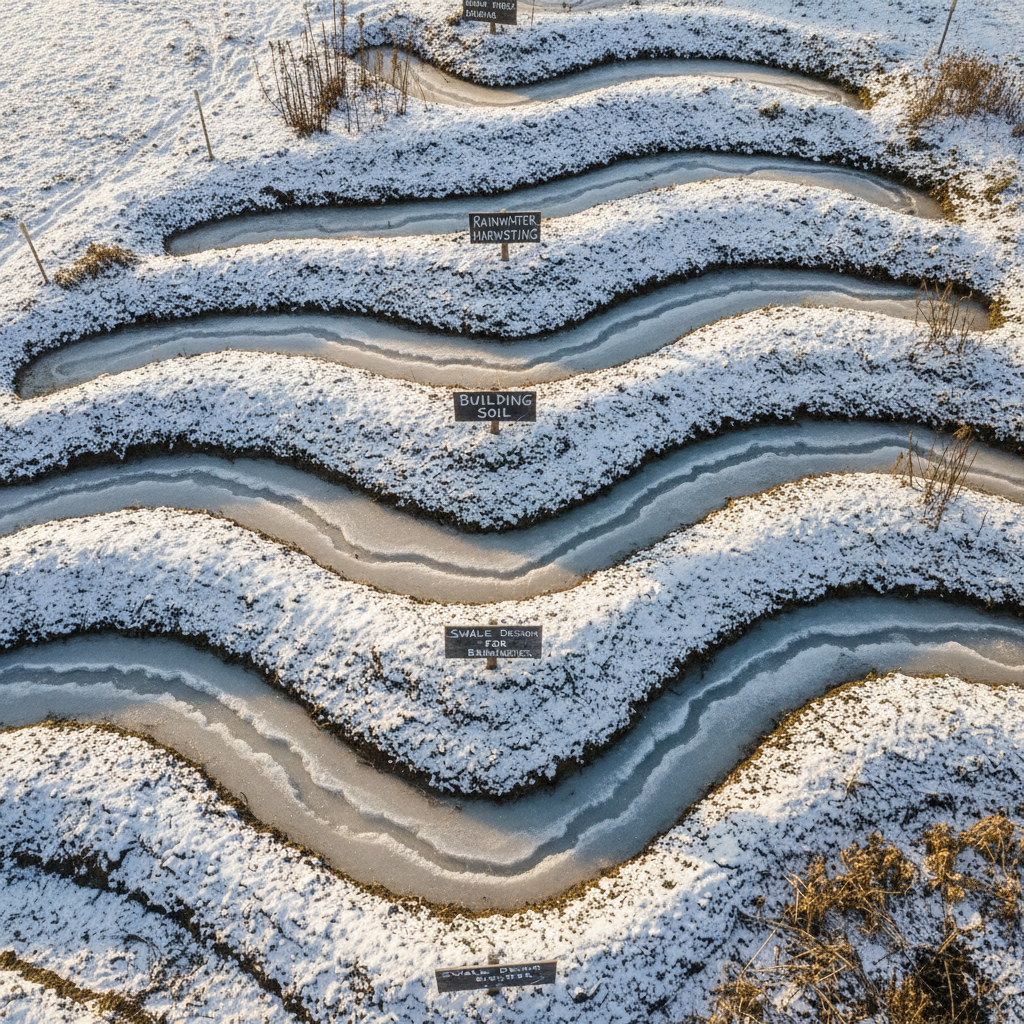
What Are Permaculture Swales and Why Map Them in Winter?
Permaculture swales are shallow ditches dug on contour—level lines across slopes. They capture runoff, slow it down, infiltrate it into soil, and create fertile edges for plants.
In permaculture, this embodies 'catch and store energy,' one of the 12 principles. Water is life; harvesting it builds resilience against droughts and floods.
Why winter? Rain reveals contours naturally. Flows trace paths without vegetation interference. Frozen or soggy ground shows low spots clearly. You'll design accurately, avoiding summer guesswork.
For beginners, winter water mapping aligns with 'observe and interact.' Spend days watching, noting, sketching. This low-effort investment pays off in functional designs.
Swales stack functions: water storage, erosion control, mulch basins, wildlife corridors. On small homesteads or suburban lots, they turn problem slopes into productive zones.
Connect to ethics: Earth care (soil protection), people care (easy food production), fair share (sustainable water use). Native plants thrive here, boosting biodiversity.
Tools You'll Need for Beginner Winter Water Mapping
Keep it simple—no fancy gear for starters.
A-frame level: Two equal poles, crossbar, level. Homemade for $10. Finds contours by sighting equal heights.
Hose level: 50-foot clear hose, fill with water. Ends at same level when connected—perfect for marking lines.
Field notebook and pencil: Waterproof if possible. Sketch flows, note observations.
Measuring tape and flags/stakes: Mark swale paths. Biodegradable works for planning.
Topographic map or app: Free online topo maps show contours preliminarily.
Boots and rain gear: Comfort rules observation.
Optional: plumb bob for precise A-frame, colored string for visualizing lines.
These tools embody 'use edges and value the marginal.' Winter edges—bare soil, clear flows—are your teachers.
Start small: one Zone 1-2 area, like veggie garden slope. Scale up as confidence grows.
Step 1: Observe Water Flow Patterns in Winter
Observation is permaculture's foundation. Dedicate 3-5 rainy days to watching.
Walk your site post-rain. Note where water ponds, channels, or sheets.
Key patterns to map:
- Gullies: Deep erosion channels. Swales above prevent worsening.
- Sheet flow: Broad runoff. Swales intercept across slope.
- Low spots: Natural basins. Enhance, don't fight.
Use zones: Zone 1 (house/garden) needs tight spacing, gentle swales. Zone 5 (wild areas) looser, natural.
Sketch roughly: Divide property into sectors (sun, wind, water paths). Mark flows with arrows.
Measure slopes: String line downhill, level it, calculate rise/run. Under 2%? Swales optional. 18%+? Multiple needed.
Pro tip: Mark with flags after rain. Return dry days to confirm.
This reveals 'edges'—transition zones where swales shine, maximizing yield.
Spend time here. Good maps prevent digging disasters.
Example: On a 10% suburban backyard slope, winter shows water funneled to fence corner. Place swale midway to spread it.
Step 2: Mark Contours for Your Permaculture Swales
Contours are level lines perpendicular to gravity—swale spines.
Start with A-frame or hose.
A-frame method:
- Build: Two 5-ft poles, 3-ft crossbar, bubble level.
- Plumb poles vertical.
- Straddle downhill, rock till level bubbles match.
- Mark ground with stake/flag.
- Leapfrog: Move uphill 5-10 ft, repeat.
String between marks for swale line.
Hose alternative: Fill, hold ends level by eye/water match. Mark along.
Zone thinking: Zone 1 swales every 10-20 ft vertically. Zone 2-3: 30-50 ft. Zone 4: 100+ ft or natural.
Swale specs for beginners:
- Width: 3-5x depth (e.g., 2 ft wide, 8-10 inches deep).
- Berm: Piled downhill soil, 1-2 ft wide.
- Gentle: 1-2% outslope on berm for spread.
Mark multiple lines: Primary swales 20-50 ft apart vertically, depending on slope.
Observe again: Does line follow natural flow? Adjust.
This 'produces no waste'—precise contours mean efficient digging.
Step 3: Design Swales with Plants and Succession in Mind
Swales aren't ditches; they're systems. Integrate life.
Stack functions: Swale stores water, berm grows nitrogen-fixers, edge plants fruit.
Plant natives immediately post-dig (spring):
- Nitrogen-fixers: Ceanothus spp. (California lilac), Amorpha fruticosa (false indigo).
- Groundcovers: Fragaria vesca (wild strawberry), Claytonia perfoliata (miner's lettuce).
- Trees/shrubs: Native elders (Sambucus spp.), serviceberry (Amelanchier alnifolia).
Succession planning: Year 1 pioneers (fast growers), Year 3 canopy.
Zone-specific:
- Zone 1: Shallow swales, herbs/perennials like mint (Mentha spp.), comfrey (Symphytum officinale).
- Zone 2: Orchard swales, fruit/nut guilds.
- Zone 3: Pasture swales, fodder plants.
- Zone 4-5: Minimal, enhance natives like willows (Salix spp.) for erosion.
Edges multiply: Plant denser there—double production.
Mulch heavily: Chips, leaves. Builds soil.
Overflows: Spillways to next swale or pond. Key for big rains.
Visualize: Sketch cross-section—ditch, berm, plants.
Permaculture ethics shine: Natives support pollinators, reduce inputs.
Step 4: Refine and Simulate Before Digging
Test design without earth-moving.
Hose simulation: Run hose along contour, watch spread/sink.
Dry run: Dig mini 3-ft test swale. Observe fill time.
Adjust: Too fast fill? Widen. Pools long? Add rocks/plants.
Software-free: Overlay sketches on topo map.
Budget time: Small site (1/4 acre), 1-2 days mapping, weeks digging.
Safety: Call utilities first. Dig by hand or mini-excavator rental.
Celebrate: Your map is gold. Share with permie friends.
This 'integrate rather than segregate'—swales link zones fluidly.
Key Takeaways
- Winter reveals truth: Map water flows now for accurate permaculture swales—no summer surprises.
- Observe first: 3-5 rainy days noting patterns builds resilient designs.
- Simple tools rule: A-frame, hose level, notebook—beginner-friendly contouring.
- Zone smart: Tight swales in Zone 1, looser in Zone 5.
- Plant natives: Stack functions with Ceanothus spp., Sambucus spp. for edges and succession.
- Principles power it: Catch energy, use edges, obtain yield from every swale.
- Test small: Mini swales confirm before big digs.
These steps turn slopes into assets, embodying permaculture ethics on your scale.
Next Steps
- Grab notebook, flags—head out next rain.
- Map one Zone 1-2 slope this weekend.
- Build A-frame today (YouTube quick).
- Sketch design, share in permaculture group for feedback.
- Spring: Dig first swale, plant pioneers.
Your water-harvesting journey starts now. Small actions yield big abundance.
Curated by
Daniel Crawford
Regenerative Systems Designer