Beginner Keyline Design: Map Water Flow Winter Guide
Imagine standing on your homestead this winter, boots crunching through frost-covered grass. Rain hits, and you watch water rush down gullies, carving paths of erosion or pooling uselessly. Your garden dreams? Washed away or parched come summer.
You're not alone. Many beginners face this: unplanned water turns fertile land barren. But winter is your secret weapon. With leaves gone, contours shine clear. Keyline design changes everything. You'll map water flow now, harnessing every drop for abundant permaculture systems.
No heavy equipment needed. Just observation, a few tools, and this guide. Picture swales filling ponds, soil soaking up moisture, natives thriving in zones. Your small farm or suburban plot transformed. Ready to start? Let's dive in. (148 words)
Why Keyline Design Matters in Permaculture
Keyline design is a permaculture powerhouse for water management. Pioneered by P.A. Yeomans, it captures, stores, and spreads rainfall evenly across your landscape. Think of it as directing water like veins in a leaf—nourishing every cell.
In permaculture, water is life. Poor flow means erosion, compaction, and crop failure. Keyline fixes this by following natural contours, slowing water to infiltrate soil. It stacks functions: builds topsoil, recharges aquifers, grows fodder.
Why winter? Bare trees reveal true topography. You observe without summer distractions, aligning with permaculture's first principle: observe and interact. For beginners, it's forgiving—no digging yet, just planning.
Connects to ethics too. Earthcare via soil regeneration. Fair share by maximizing yields from rain alone. Small-scale heroes like you reclaim water sovereignty. No chemicals, no waste. Just smart design. (198 words)
Observe Your Landscape: Winter Site Analysis
Winter mapping starts with eyes wide open. Grab notebook, camera, and sturdy boots. Walk your entire site—Zones 1 to 5. Zone 1: your veggie patch. Zone 5: wild edges.
Note water paths. After rain, trace where it flows fastest. Mark gullies, puddles, seeps. Feel soil: sticky clay slows water; sandy slips away.
Use free tools. Google Earth or topo maps show contours—lines of equal elevation. Print one at 1:5000 scale for your permaculture water map.
Build an A-frame level. Three sticks in triangle, string crosshair, plumb bob. Stake it; it finds contours cheaply. Walk transects—straight lines across slopes. Flag every contour line. Boom: your base map.
Observe wind too. Bare branches show patterns. Sun angles lower—shadows reveal microclimates. Native species clues: willows (Salix spp.) hug wet spots; oaks (Quercus spp.) crown dry ridges.
Principle: obtain a yield from observation. Sketch Zones: intensive Zone 1 fruits, Zone 2 perennials, Zone 3 pastures, Zone 4 forage, Zone 5 wilderness. Water dictates placement.
Spend days here. Rainy weeks? Goldmine. Your permaculture water map emerges, timeless blueprint. (212 words)
Find Your Keypoint: The Heart of Keyline Design
Keypoint is magic. It's where water slows most in a valley—often ridge nose or gully bottom. From here, keyline flows parallel, spreading abundance.
Spot it winter-style. Follow contours from map. Highest point in lowest valley flow. Subtle: slight depression where grass greener, soil damper.
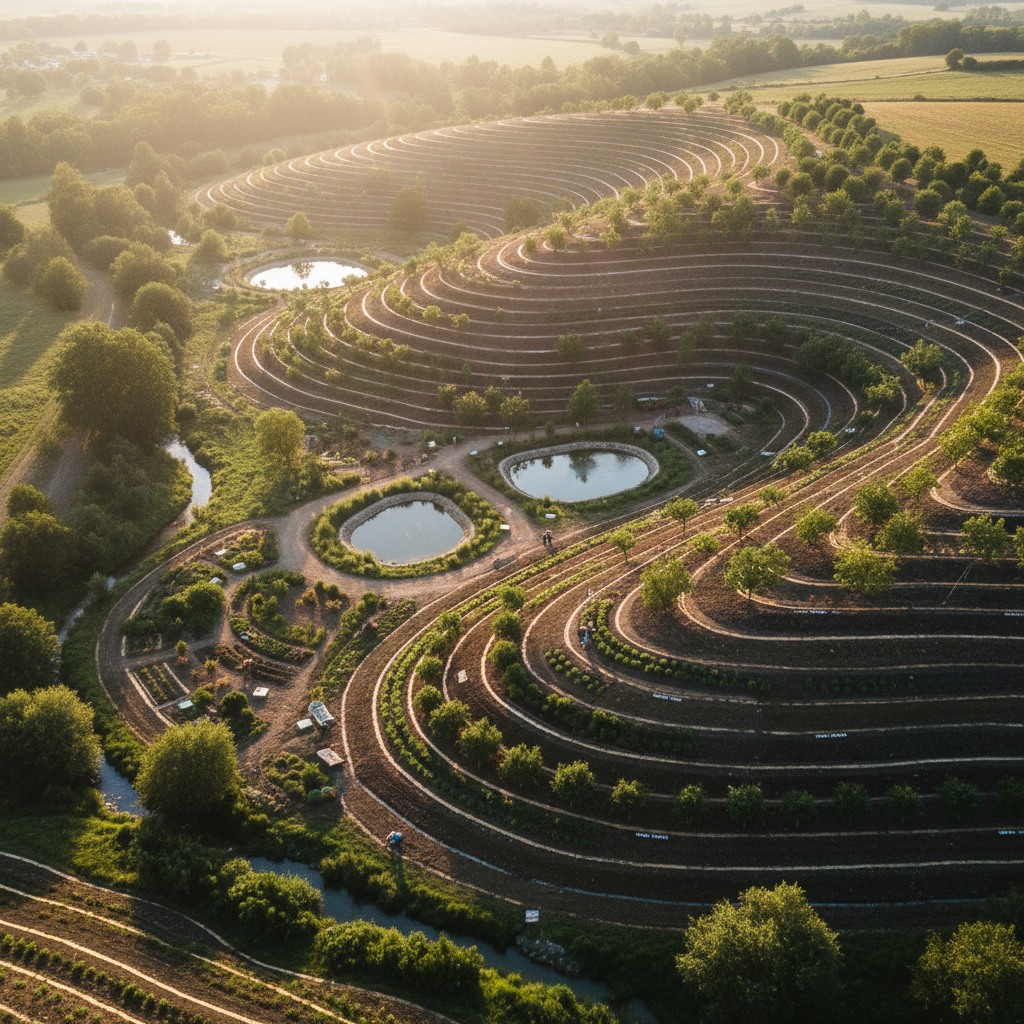
Mark with flags. Measure slight fall—1:2000 grade away from keypoint. This is your primary keyline: shallow swale or plow line.
Why? Water spreads fan-like downslope. In permaculture, edges multiply: keyline creates moist micro-edges for plants.
Scale for beginners. Half-acre homestead? One keyline suffices. Larger farm? Multiple valleys, multiple keypoints.
Integrate zones. Keypoint in Zone 3 pasture? Swale edges plant Zone 2 guilds. Natives like red osier dogwood (Cornus sericea) stabilize—nitrogen-fixing, wildlife feed.
Test: pour bucket water at keypoint. Watch spread. Adjust flags. Principle: apply self-regulation—let land teach.
Your map now has lines. Arrows show flow direction. Color-code: blue for harvest paths, green for infiltration. (198 words)
Design the Keyline Swale: Beginner Layout Steps
Swale time. Dig shallow ditch on keyline, berm downhill. Captures runoff, infiltrates slowly.
Winter plan: mark precisely. Offset parallel to contour—1m upslope for plow, or dig line for swale. Wing ends upslope to funnel water in.
Dimensions for small sites: 1-2m wide, 30-50cm deep, 1:2000 grade. Berm same height, seeded immediately.
Stack functions. Swale base: mulch hay. Edges: nitrogen-fixers like autumn olive (Elaeagnus umbellata)—but check local natives; ceanothus (Ceanothus spp.) West Coast gems.
Zone thinking: Zone 1 above berm—berries (Rubus spp. natives). Zone 2 swale edge—herbs, perennials. Succession: pioneers like comfrey (Symphytum officinale), then fruit trees.
Tools: string line between flags, A-frame check. Hose test: flow along grade, no ponding.
Permaculture principle: use edges. Swale creates 3x planting space. Mulch heavily winter—builds soil by spring dig.
Visualize yield: pond spillway feeds swale, overflow to next. Closed loop. Beginners: start one swale. Success builds confidence. (228 words)
Integrate Plants and Zones Along Your Keyline
Plants make keyline sing. Winter planning: list natives for moisture zones.
Berm top: deep-rooted grasses like switchgrass (Panicum virgatum). Stabilize, fodder for Zone 3 animals.
Swale bottom: moisture-lovers. Native sedges (Carex spp.), rushes (Juncus spp.). Filter, habitat.
Edges: guilds. Trees like river birch (Betula nigra) upslope, shade Zone 1. Under: elderberry (Sambucus canadensis), berries stack food, medicine.
Zone progression: Zone 1 intensive—raised beds fed by diversion drain from swale. Zone 2: food forest along berm. Zone 4: wild paddock, keyline boosts pasture.
Succession principle: start colonizers. Lupines (Lupinus spp.) fix nitrogen, die back to mulch. Follow with oaks (Quercus spp.).
Winter bonus: order bare-root natives now. Cheap, plant spring. Map placements on permaculture water map—circles for trees, lines for hedges.
Edge effect: plant denser at curves. More yield per meter.
Observe patterns: bird droppings mark hotspots. Your design pulses life. (202 words)
Winter Simulation and Spring Prep for Keyline Success
Don't dig yet. Simulate winter.
Poke holes along marked line—test infiltration. Clay? Add gypsum plan. Sandy? Mulch heavy.
Build mini-model: dirt tray, hose water. Tweak grades.
Refine map. Add overflows, spillways to ponds. Link swales valley-wide.
Permaculture ethics: care people—design access paths on berms for wheelbarrows.
Stack: keyline grows mushrooms (Zone 2 edges), aquaculture (ponds fed by it).
Winter tasks:
- Finalize permaculture water map.
- Source tools: shovel, level.
- Study locals: natives lists from extension services.
Spring: dig post-frost. Wet soil easy. You'll smile at winter prep paying off.
Principle: integrate rather than segregate. Keyline weaves water, soil, life. Beginners thrive here—small wins scale. (168 words)
Key Takeaways
- Observe winter bare: Map contours with A-frame, trace flows for accurate permaculture water map.
- Keypoint anchors: Find valley slow-spot; run keyline parallel 1:2000 grade to spread water.
- Swale basics: Shallow ditch-berm on keyline; mulch, plant natives like Salix spp. and Carex spp.
- Zone synergy: Zone 1 beds above, Zone 2 guilds on edges, Zone 3 pastures boosted.
- Principles power: Observe, edges, succession, stacking—keyline embodies permaculture.
- Winter wins: Plan now, simulate, source plants; spring implementation smooth.
These steps turn beginners into water wizards. Celebrate: one keyline hydrates homestead dreams. (142 words)
Next Steps
- Print topo map today. Walk site post-rain.
- Build A-frame this weekend. Flag contours.
- Sketch keypoint, swale lines on paper.
- List 10 native plants for your region.
- Share map with permie friends for feedback.
Start small—one valley. Watch abundance unfold. You've got this! (72 words)
(Total: ~1968 words)
Curated by
Daniel Crawford
Regenerative Systems Designer