Suburban Permaculture: Zone 1-2 Mapping for Winter Plans
Imagine this: It's a crisp winter morning in your suburb. You sip coffee, gazing at your yard blanketed in snow. No leaves obscure the view, revealing the true bones of your space—fences, slopes, sunny spots. This is your golden window for suburban permaculture planning.
As a beginner, you might feel overwhelmed by permaculture designs. But winter mapping Zones 1-2 changes that. These closest zones to your home get the most attention, yielding daily harvests with minimal effort. No more guessing where to plant; you'll create a blueprint for spring abundance.
Suburban lots are tiny canvases, often 1/4 acre or less. Yet, with smart zoning, you stack food, beauty, and habitat. Winter's downtime lets you observe without distraction. You'll spot wind patterns in drifting snow, soil moisture in melt spots, and microclimates by warm walls.
This planning solves the chaos of spring rushes. No more impulse buying flats of annuals that flop. Instead, you design intentionally, honoring permaculture ethics: earth care, people care, fair share. Your family eats fresh, pollinators thrive, and neighbors envy your oasis.
Ready to turn winter blues into green dreams? Let's map those Zones 1-2.
Why Zone 1-2 Mapping Matters in Suburban Permaculture
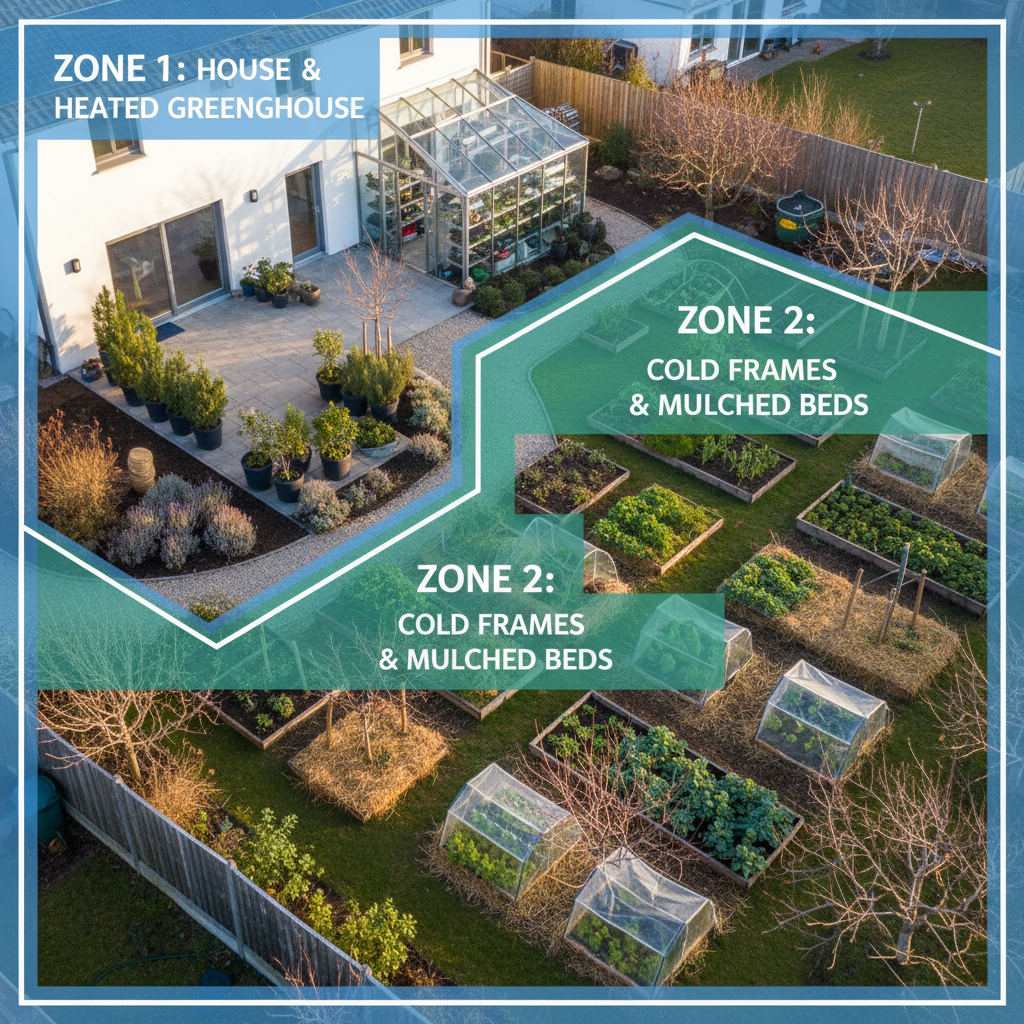
In permaculture, zones organize your design by use frequency. Zone 1 is your doorstep intensive—daily visits for herbs, salads, eggs. Zone 2 expands to weekly checks: berries, fruits, chickens. Farther zones (3-5) are low-maintenance perennials, wild areas.
Suburban permaculture thrives on this. Your small yard can't waste space on low-yield plants near the house. Mapping ensures efficiency. Winter is ideal—no growth hides issues like poor drainage or shade from evergreens.
Why now? Plants dormant, you see structure. Bare trees show branch spreads for guilds. Snow reveals paths you'd naturally take, guiding zone boundaries. Time frees you from weeding; focus sharpens.
This aligns with the observe principle. Bill Mollison taught: design from patterns to details. Winter patterns—sun arcs, frost pockets—inform resilient systems. You'll integrate natives like elderberry (Sambucus canadensis) for multifunctional edges.
Benefits stack: reduced inputs, biodiversity, joy. Beginners succeed here—small wins build confidence. Your map becomes a living document, evolving with seasons.
Observing Your Site: Winter's Clear Vision
Step outside bundled up. Grab a notebook, pencil, camera. Walk your yard slowly, multiple times daily. Note sun positions hourly if possible—shadows shift.
Sketch rough boundaries. Measure your lot: pace it out (one pace ≈1 yard). Note house orientation—south-facing front? Prime Zone 1.
Observe patterns:
- Water flow: Snowmelt paths show run-off. Divert to swales?
- Wind: Flags or smoke trace directions. Plant windbreaks in Zone 2.
- Soil: Dig test holes. Clay? Sandy? Note wet/dry spots.
- Existing elements: Trees, fences, utilities. Protect or repurpose.
Use a compass app for north. Mark microclimates: warm south walls for figs (Ficus carica, hardy natives nearby), cool north for shade-lovers.
Natives shine: Pawpaw (Asimina triloba) for Zone 2 understory, tolerating suburb shade. List potentials: what grows locally? Check extension services.
Photograph everything. Label by time/weather. This data fuels your map—no guesswork.
Over a week, patterns emerge. Your yard isn't flat; contours create edges for permaculture magic. Edges multiply yields—think berry brambles along fences.
Action: Spend 30 minutes daily observing. You'll uncover gems like a sunny berm perfect for strawberries (Fragaria vesca natives).
Sketching Your Suburban Zone 1-2 Maps
Time to draw. Use graph paper or plain—scale 1 inch = 5 feet for suburb lots. Start with aerial view: trace house, driveway, patio from memory/Google Earth.
Overlay observations:
- Outline property lines, structures.
- Shade sun/no-sun areas.
- Draw contours (even slight slopes matter).
- Mark paths: shortest from door to compost?
Define zones. Zone 1: 1000 sq ft max around entrances. Include kitchen door access, paths <20 feet wide for wheelbarrows.
Zone 2: Next ring, 1/4-1/2 acre ring. Orchard, poultry run—fenced from deer.
Layer functions. Zone 1: Raised beds, pots, worm bin. Stack: trellis peas on chicken coop fence.
Use colors: Green for veg, blue water, brown paths. Add symbols—tree for fruit, circle for bush.
Incorporate principles:
- Sector analysis: Sun/wind arrows influence placement.
- Succession: Annuals fade to perennials.
Native focus: Zone 1 herbs like wild bergamot (Monarda fistulosa), pollinator magnets. Zone 2: Hazelnut (Corylus americana) guilds.
Iterate maps. Version 1 rough, refine weekly. Tape to window for easy tweaks.
Pro tip: Draw north arrow. Scale bar. Legend for symbols. Digital? Freehand first—feels personal.
Your map lives. Update post-observation surprises, like a hidden spring.
Designing Zone 1: Your Kitchen Garden Core
Zone 1 demands max yield, min effort. Aim 20% lot, intensive polyculture.
Layout: Keyhole beds, mandala circles—access from all sides, no-till.
Plants:
- Salad greens: Lettuces, kales (Brassica oleracea) interplanted.
- Herbs: Chives (Allium schoenoprasum), oregano (Origanum vulgare)—perennial, cut-and-come.
- Natives: Violets (Viola sororia) edible groundcover, strawberries.
Stack functions: Dwarf fruit like alpine strawberries under vertical peas. Chickens fertilize via tractor.
Water: Drip lines from rain barrels. Greywater safe plants nearby.
Edges: Hugelkultur mounds—wood chips, soil—retain moisture, succession from annuals to shrubs.
Winter prep: Mulch heavily. Plan spring succession: radishes under broccoli.
Example guild: Central comfrey (Symphytum officinale) dynamic accumulator, chop-and-drop. Surround with tomatoes, basil, nasturtiums (pest trap). Native borage (Borago officinalis) kin nearby.
Paths: Woodchips or stepping stones—absorb heat, easy clean.
Celebrate small: One 4x8 bed yields weekly salads. Beginners, start here.
Designing Zone 2: Fruitful Orchards and Berries
Zone 2 eases intensity. Weekly harvest: fruits, nuts, greens.
Layout: Food forest style. Trees spaced 10-15 ft, understory shrubs, groundcovers.
Trees: Apples (Malus domestica disease-resistant), pears. Natives: Serviceberry (Amelanchier arborea)—bird food, early fruit.
Shrubs: Currants (Ribes spp.), elderberry (Sambucus canadensis). Edge fences with raspberries (Rubus idaeus).
Guilds: Tree + nitrogen fixer (clover Trifolium repens), chop-and-drop (comfrey), insectary (yarrow Achillea millefolium).
Animals: Chicken run weaves through, fertilizing. Ducks for slugs.
Water: Swales on contour catch run-off. Pond edge if space.
Principles:
- Edge: Wavy paths increase perimeter.
- Stack: Trees shade poultry, drop mulch.
Succession: Meadow to orchard over years. Plant pioneers like nitrogen fixers first.
Winter mapping bonus: See tree canopies for light gaps. Prune now.
Scale for suburbs: 5-10 trees max. Espalier on fences saves space.
Yields build: Year 1 berries, Year 3 fruits. Patience pays.
Integrating Principles: Making It All Work
Tie with ethics. Observe refined your map. Now apply:
Obtain a Yield: Every element produces—food, mulch, habitat.
Apply Self-Regulation: Chickens control pests, no sprays.
Use Edges: Curvy beds, diverse guilds.
Integrate Don't Segregate: Zones flow—Zone 1 compost feeds Zone 2.
Natives boost resilience: American persimmon (Diospyros virginiana) pest-resistant, wildlife food.
Common pitfalls: Overplant Zone 1. Balance.
Test: Walk your map mentally. Daily needs met? Paths logical?
Refine yearly. Permaculture evolves.
Key Takeaways
- Winter is prime for suburban permaculture Zone 1-2 mapping—clear views, time to plan.
- Observe patterns first: sun, water, wind, soil—foundation of good design.
- Sketch scaled maps with zones, symbols, colors for clarity.
- Zone 1: Intensive beds, herbs, salads with natives like wild bergamot (Monarda fistulosa).
- Zone 2: Fruit guilds, berries, chickens—stack functions with serviceberry (Amelanchier arborea).
- Apply principles: edges, succession, stacking for efficiency and ethics.
- Use natives for resilience, biodiversity, low inputs.
- Start small: One bed, one guild—builds momentum.
- Your map is living—update seasonally.
- Celebrate progress: Small yards yield big when zoned smart.
Next Steps
Grab paper, pencil today. Observe 30 minutes. Sketch base map.
List 5 natives for your climate—extension office helps.
Research one guild: Draw it in.
Share sketches with a permie friend for feedback.
Spring: Implement one Zone 1 bed. Watch magic unfold.
You're building legacy—happy planning!
Curated by
Daniel Crawford
Regenerative Systems Designer